
|
|
This chapter describes how to configure Integrated IS-IS. For a complete description of the integrated IS-IS commands listed in this chapter, refer to the "Integrated IS-IS Commands" chapter of the Network Protocols Command Reference, Part 1. To locate documentation of other commands that appear in this chapter, use the command reference master index or search online.
Intermediate System-to-Intermediate System (IS-IS) is an International Organization for Standardization (ISO) dynamic routing specification. IS-IS is described in ISO 10589. Cisco's implementation of IS-IS allows you to configure IS-IS as an IP routing protocol.
To configure IS-IS, complete the tasks in the following sections. Enabling IS-IS is required; the remainder of the tasks are optional, although you might need to perform them, depending upon your specific application.
In addition, you can filter routing information and specify route redistribution. See the "Filter Routing Information" and "Redistribute Routing Information" sections, respectively, in the "Configuring IP Routing Protocol-Independent Features" chapter for information on how to do this.
See the end of this chapter for an IS-IS configuration example.
Unlike other routing protocols, enabling IS-IS requires that you create an IS-IS routing process and assign it to specific interfaces (rather than to networks). You can specify only one IS-IS process per router. Only one IS-IS process is allowed whether you run it in integrated mode, ISO CLNS only, or IP only.
Network entity titles (NETs) define the area addresses for the IS-IS area and the system ID of the router. Refer to the "Configuring ISO CLNS" chapter in Network Protocols Configuration Guide, Part 3 for a more detailed discussion of NETs.
To enable IS-IS, perform the following tasks starting in global configuration mode:
| Task | Command |
|---|---|
| Step 1 Enable IS-IS routing and specify an IS-IS process for IP, which places you in router configuration mode. | router isis |
| Step 2 Configure NETs for the routing process; you can specify a name for a NET as well as an address. | net network-entity-title |
| Step 3 Enter interface configuration mode. | interface type number |
| Step 4 Specify the interfaces that should be actively routing IS-IS. | ip router isis [tag] |
See the "IS-IS as an IP Routing Protocol Example" section at the end of this chapter for an example of configuring IS-IS as an IP routing protocol.
Cisco Systems' IS-IS implementation allows you to alter certain interface-specific IS-IS parameters. Most interface configuration commands can be configured independently from other attached routers. The isis password command should configure the same password on all routers on a network. The settings of other commands (isis hello-interval, isis hello-multiplier, isis retransmit-interval, isis retransmit-throttle-interval, isis csnp-interval, and so on) can be different on different routers or interfaces. However, if you decide to change certain values from the defaults, it makes sense to configure them on multiple routers and interfaces.
You can perform these tasks, described in the following sections:
You can configure a cost for a specified interface. You can configure the default-metric for Level 1 or Level 2 routing. To configure the metric for the specified interface, perform the following task in interface configuration mode:
| Task | Command |
|---|---|
| Configure the metric (or cost) for the specified interface. | isis metric default-metric {level-1 | level-2} |
You can specify the length of time (in seconds) between hello packets that the Cisco IOS software sends on the interface.
To specify the length of time between hello packets for the specified interface, perform the following task in interface configuration mode:
| Task | Command |
|---|---|
| Specify the length of time, in seconds, between hello packets the Cisco IOS software sends on the specified interface. | isis hello-interval seconds {level-1 | level-2} |
The hello interval can be configured independently for Level 1 and Level 2, except on serial
point-to-point interfaces. (Because there is only a single type of hello packet sent on serial links, it is independent of Level 1 or Level 2.) Specify an optional level for X.25, SMDS, and Frame Relay multiaccess networks. X25, SMDS, ATM, and Frame Relay networks should be configured with point-to-point subinterfaces.
Complete sequence number PDUs (CSNPs) are sent by the designated router to maintain database synchronization. You can configure the IS-IS CSNP interval for the interface.
To configure the CSNP interval for the specified interface, perform the following task in interface configuration mode:
| Task | Command |
|---|---|
| Configure the IS-IS CSNP interval for the specified interface. | isis csnp-interval seconds {level-1 | level-2} |
This feature does not apply to serial point-to-point interfaces. It applies to WAN connections if the WAN is viewed as a multiaccess meshed network.
You can configure the number of seconds between retransmission of IS-IS link state PDUs (LSPs) for point-to-point links. To set the retransmission level, perform the following task in interface configuration mode:
| Task | Command |
|---|---|
| Configure the number of seconds between retransmission of IS-IS LSPs for point-to-point links. | isis retransmit-interval seconds |
The value you specify should be an integer greater than the expected round-trip delay between any two routers on the attached network. The setting of this parameter should be conservative, or needless retransmission will result. The value should be larger for serial lines.
To configure the delay between successive IS-IS link state packet transmissions, perform the following tasks in interface configuration mode:
| Task | Command |
|---|---|
| Configure the delay between successive IS-IS link state packet transmissions. | isis lsp-interval milliseconds |
You can configure the maximum rate at which IS-IS link state PDUs (LSPs) will be retransmitted on point-to-point links, in terms of the number of milliseconds between packets. This is different from the retransmission interval, which is the amount of time between successive retransmissions of the same LSP.
The retransmission throttle interval is typically not necessary, except in cases of very large networks with high point-to-point neighbor counts. To set the retransmission throttle interval, perform the following task in interface configuration mode:
| Task | Command |
|---|---|
| Configure the IS-IS LSP retransmission throttle interval. | isis retransmit-throttle-interval milliseconds |
To specify the number of IS-IS hello packets a neighbor must miss before the router should declare the adjacency as down, perform the following task in interface configuration command. The default value is 3.
| Task | Command |
|---|---|
| Set the hello multiplier. | isis hello-multiplier multiplier {level-1 | level-2} |
You can configure the priority to use for designated router election. Priorities can be configured for Level 1 and Level 2 individually.
To specify the designated router election, perform the following task in interface configuration mode:
| Task | Command |
|---|---|
| Configure the priority to use for designated router election. | isis priority value {level-1 | level-2} |
You can specify adjacency levels on a specified interface. This parameter is also referred to as the interface circuit type.
To specify the interface circuit type, perform the following task in interface configuration mode:
| Task | Command |
|---|---|
| Configure the type of adjacency desired for neighbors on the specified interface (the interface circuit type). | isis circuit-type {level-1 | level-1-2 | level-2-only} |
You can assign different passwords for different routing levels. Specifying Level 1 or Level 2 configures the password for only Level 1 or Level 2 routing, respectively. If you do not specify a level, the default is Level 1. By default, authentication is disabled.
To configure a password for the specified level, perform the following task in interface configuration mode:
| Task | Command |
|---|---|
| Configure the authentication password for a specified interface. | isis password password {level-1 | level-2} |
These tasks differ from the preceding interface-specific IS-IS tasks because they configure IS-IS itself, rather than the interface.
You can configure optional IS-IS parameters as described in the following sections:
You can force a default route into an IS-IS routing domain. Whenever you specifically configure redistribution of routes into an IS-IS routing domain, the Cisco IOS software does not, by default, redistribute the default route into the IS-IS routing domain. The following feature allows you to force the boundary router to redistribute the default route or generate a default route into its L2 LSP. You can use a route-map to conditionally advertise the default route, depending on the existence of another route in the router's routing table.
To generate a default route, perform the following task in router configuration mode:
| Task | Command |
|---|---|
| Force a default route into the IS-IS routing domain. | default-information originate [route-map map-name] |
See also the discussion of redistribution of routes in the "Configuring IP Routing Protocol-Independent Features" chapter.
You can configure the router to act as a Level 1 (intra-area) router, as both a Level 1 router and a Level 2 (interarea) router, or as an interarea router only.
To specify router level support, perform the following task in router configuration mode:
| Task | Command |
|---|---|
| Configure the system type (area or backbone router). | is-type {level-1 | level-1-2 | level-2-only} |
You can assign passwords to areas and domains.
The area authentication password is inserted in Level 1 (station router level) LSPs, CSNPs, and partial sequence number PDUs (PSNPs). The routing domain authentication password is inserted in Level 2 (the area router level) LSP, CSNP, and PSNPs.
To configure either area or domain authentication passwords, perform the following tasks in router configuration mode:
| Task | Command |
|---|---|
| Configure the area authentication password. | area-password password |
| Configure the routing domain authentication password. | domain-password password |
You can create aggregate addresses that are represented in the routing table by a summary address. This process is called route summarization. One summary address can include multiple groups of addresses for a given level. Routes learned from other routing protocols also can be summarized. The metric used to advertise the summary is the smallest metric of all the more-specific routes.
To create a summary of addresses for a given level, perform the following task in router configuration mode:
| Task | Command |
|---|---|
| Create a summary of addresses for a given level. | summary-address address mask {level-1 | level-1-2 | level-2} |
You can configure the router to set the overload bit (also known as the hippity bit) in its non-pseudonode LSPs. Normally the setting of the overload bit is allowed only when a router runs into problems. For example, when a router is experiencing a memory shortage, it might be that the Link State database is not complete, resulting in an incomplete or inaccurate routing table. By setting the overload bit in its LSPs, other routers can ignore the unreliable router in their SPF calculations until the router has recovered from its problems.
The result will be that no paths through this router are seen by other routers in the IS-IS area. However, IP and CLNS prefixes directly connected to this router will be still be reachable.
This command can be useful when you want to connect a router to an ISIS network, but don't want real traffic flowing through it under any circumstances. Examples are:
To set the overload bit, perform the following task in router configuration mode:
| Task | Command |
|---|---|
| Set the overload bit. | set-overload-bit |
You can display the IS-IS link state database by performing the following in EXEC mode:
| Task | Command |
|---|---|
| Display the IS-IS link state database. | show isis database [level-1] [level-2] [l1] [l2] [detail] [lspid] |
| Display how often and why the router has run a full SPF calculation | show isis spf-log |
This section contains an IS-IS configuration example.
The following example shows how to configure three routers to run IS-IS as an IP routing protocol. Figure 24 illustrates the example configuration.
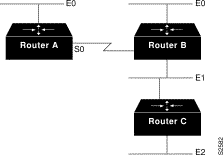
router isis
 net 49.0001.0000.0000.000a.00
interface ethernet 0
 ip router isis
interface serial 0
 ip router isis
router isis
 net 49.0001.0000.0000.000b.00
interface ethernet 0
 ip router isis
interface ethernet 1
 ip router isis
interface serial 0
 ip router isis
router isis
 net 49.0001.0000.0000.000c.00
interface ethernet 1
 ip router isis
interface ethernet 2
 ip router isis
|
|